
'I want to find the guy that invented compression and tear his liver out. I hate it. It makes everything sound like a beer commercial.' - Steve Albini makes a point about compression in his own inimitable style. Read 'The Problem with Music' for the context.
 What
is Compression?
What
is Compression?
Compression
is a dynamic process that is commonly used in a whole host of audio
applications. It can be hard to hear in a mix so it often confuses people, and
there is a degree of mysticism surrounding its correct use. Despite this (and Steve Albini's apparently partisan views on the topic), don’t be put off, compression
can be an extremely useful tool both for correcting audio problems and creating effects. It’s actually relatively simple too, once you get your head around it.
Compressors are well worth taking the time to understand and practice, just don't overuse them or Steve will get angry!
Why
use Compression?
The
main function of a compressor is to control the dynamic range of source
audio. Imagine you are recording a snare drum. The drummer (understandably)
hits the drumhead at slightly different velocities each time she plays a beat.
This results in a recording that has an uneven dynamic range as the performance
progresses. We might use a compressor here to tame the dynamic changes between hits
by squashing the transient of the waveform of any hits above a designated
level, we call this the threshold (more on compressor controls later).

Of
course, controlling the dynamic range of an audio signal has a multitude of
applications in the mixing environment other than the snare example above. Here are some of the most common ones:
- We can use compressors to make vocal recordings more intelligible by balancing the dynamic range to bring forward the less defined syllables from the performance. Listen to the examples in this article by Mike Senior for Sound on Sound : Uncompressed Vocals and Compressed Vocals (there are quite a few audio examples in the article, so take the time to listen and read Mike’s comments).
- Another application of compressors is to make individual tracks ‘sit’ together. This is done by applying a compressor to the whole mix or a stereo bus. By doing this, you can add smoothness, coherence (glue) and punch to the sound. Just be cautious about completing your whole mix and then whacking a stereo compressor on the mix bus; you may inadvertently change some of the balance and mix decisions you made earlier. This can be avoided by: adding a mix bus compressor at the outset of the mix process, so that all mix decisions are made through the compressor; or by only adding very subtle, mastering compression after the mix is completed. On a stereo bus however, such as the drums or backing vocals, you can probably afford to be a little more liberal with your compression.
- Many compressors include a ‘sidechain’ function. This feature is used to make the compressed track ‘duck’ when the compressor receives a sidechain input signal. A common use of this technique is to apply a compressor to a bass guitar track, then send the compressor a sidechain input signal from the kick drum. Each time the kick is played, the compressor receives a signal telling it to apply compression to the bass. This means that the bass ‘ducks’ and allows the kick to sound more clearly defined (demonstrated here by Warren Huart). You could use this technique alongside the kick/bass EQ tip in my last post for even more definition... Of course, sidechaining can be applied to any genre and any occasion where you need one instrument (often of a similar frequency range to another) to duck and make some room in the mix. Guitars and pads maybe, or another classic case, in ‘dance’ music to make the track ‘pump’ by sidechaining other compressors, often on strings, pads or even the whole mix from the kick drum. Note: You should also be aware that there is no need for the sidechain signal to be audible, you can actually deselect the outputs but still use the signal to feed a sidechain input via a bus.
- Parallel compression can add the benefits of heavy compression without losing the definition of an uncompressed recording. This is a really fantastic application of compression which can be used to add weight and punch to a drum sound whilst, at the same time letting it ‘breathe’. It can be also used on vocals and a multitude of other applications to great effect. But you don’t need to take my word for it, Andrew Scheps is a huge advocate of parallel processing in general, here he is discussing parallel compression and some of his applications of it. Warren Huart, demonstrates parallel compression on a drum bus here and Sound on Sound discuss it, in their usual abundance of detail, here.
- The final application of a compressor I will discuss is rather an important one. The tone of the compressor itself, can be used to add flavour to a track. What I mean is that the signature sound of the actual unit has characteristics that add colour to your sound. There are four main types of compressor; Tube, Optical, FET (Field Effect Transistor) and VCA. Each has a different sound:
Tube: Slow attack and release, have a
vintage feel to the sound e.g. The Fairchild Compressors
Optical: Uses a light element to compress
the signal. This can produce a smooth compression. E.g. LA2A, which features a tube
in the make-up gain circuit.
FET: Uses a transistor circuit for
the compression. This means that they are fast and clean sounding. Great for a
range of applications like vocals, bass etc. etc. E.g. The 1176, which is found
in most studios in one form or another!
VCA: Fast and punchy can be great on a snare or electric guitar. E.g. G series SSL or dbx 160
VCA: Fast and punchy can be great on a snare or electric guitar. E.g. G series SSL or dbx 160

The basic
controls on your typical compressor are as follows:
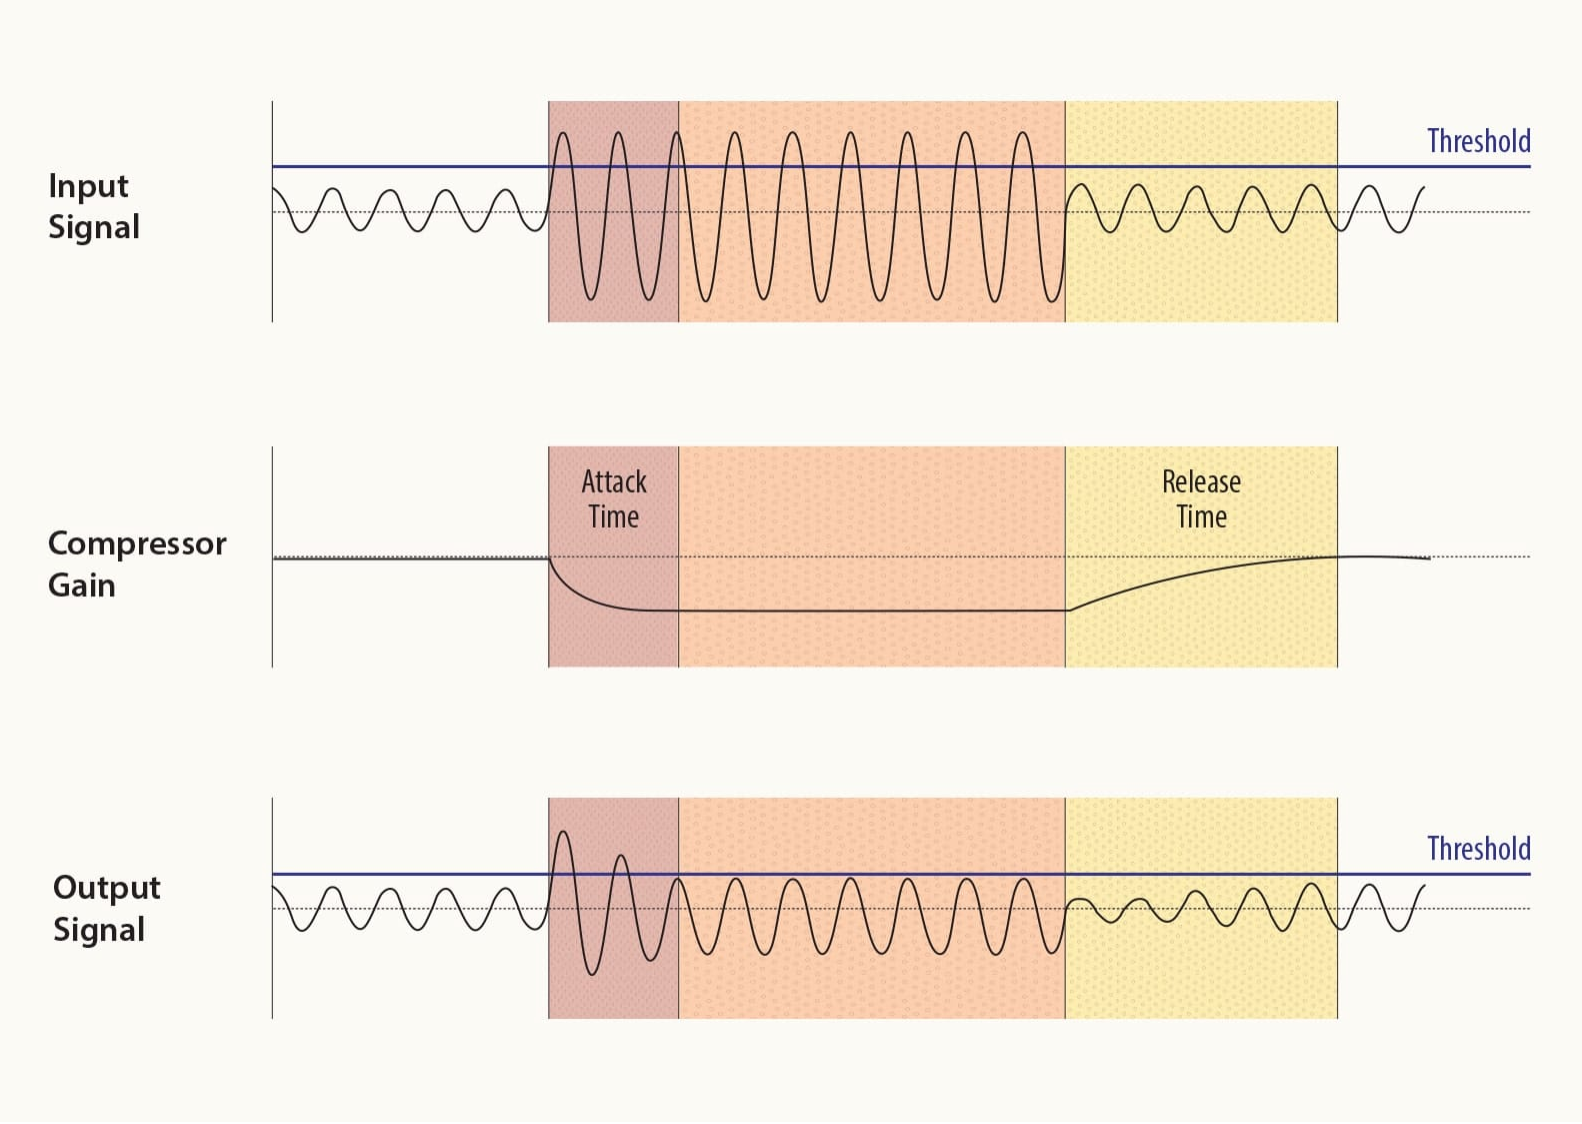
Threshold: The point at which the compressor
starts to starts to work. If the threshold is set to -6dB, any transients above
that point will be squashed by the desired level.
Attack
and Release: Attack
is how long it takes compression to begin after a transient has passed the
threshold. Release is how long it takes
for the compression to switch off after the audio drops below the threshold
level.
Ratio:
This is the
setting that designates how much compression will take place after the signal
exceeds the threshold level. In the example above, where I said that the threshold
was set to -6dB, a ratio of 2:1 would
mean any signal exceeding -6dB would be reduced to 1/2 of its original value.
So, if the uncompressed signal hit -2dB, the compressed (at a ratio of 2:1)
would hit -4dB.
A
ratio of 1:1 would therefore have no effect and a ratio of ∞:1 would mean that
no audio would pass the threshold and effectively turn the compressor in to a limiter.

Make-up Gain
Due to
the fact that the compressor by its nature, reduces the gain of the audio, it
is necessary for a make-up gain control to allow you to compensate for this
reduction. This just means that if the compressor reduces the signal by 2dB,
you can quickly and easily add the lost level back on to the compressed signal.
Tip: It can often be useful to run one compressor into another. This is advised for 2 main reasons. Firstly, you may want a combination of the features of the compressor types described above. For example, you may use an 1176’s fast attack and release to catch transients on a vocal recording before sending the signal through an LA2A to give a warm smooth tone. Secondly, it is generally advised that you should apply compression in small amounts, in a number of instances throughout the mix, rather than adding a big chunk of compression using one insert point for example.
Next...
Now I have covered the rather expansive area of compression, my next post intends to take a look at some of the other dynamic processes that you might find useful.
Take care,
Ian
Comments
Post a Comment