After tackling the rather colossal topic of compression in the previous post, now seems a sensible time to take a look at some ‘other’ dynamic processes, that perhaps don't generate quite so much discussion. Much of the terminology and many of the controls are the same across the range of dynamic processors, so it’s highly recommended you read last week’s post before moving on.
What are dynamic processors?
All dynamic processors (including compressors) are simply audio tools that affect the dynamic range of an audio signal. Today’s post will cover the ‘other’ dynamic processors, the ones that don’t get explained as often, the ones you might be a little confused about. Hopefully we can provide a little clarity and give you the confidence to try out some new techniques.
Okay, let’s get straight into it.
Limiters
 | |
|
What are they?
After reading my last post, you hopefully have a decent grasp of how and why a compressor works. If that’s the case, limiters should be reasonably easy to get to grips with, as they are pretty similar beasts. The main difference between a compressor and a limiter occurs when our signal hits the threshold level. Whereas, with a compressor, an proportion of signal will be allowed to pass the threshold (the actual amount depends on your ratio settings), a limiter stops the signal completely (like having a ratio of ∞:1).
In actual
fact, a ratio of anything above 10:1 may be described by some as limiting, due to the
signal reduction being so severe…. but you get the idea.
Now, you may
be thinking, that you could use a compressor as a limiter by just turning the
ratio control all the way up, and you’d be right. Many software and hardware processors are
compressor/limiters and can perform both functions. It would seem that the difference,
and the reason for the distinction in terms, stems from the old analogue units.
The ‘detector’ circuits on analogue compressors work(ed) on a Root Mean Square
(RMS) basis, meaning that transients would often pass the threshold. Limiter’s
detection circuits worked on a ‘Peak’ basis, meaning they would not let any
part of the signal past the threshold. So limiters truly limit the signal by stopping any part of it from passing the threshold. Modern software compressor/limiters will often include a 'Peak' setting to reflect this.
Basic Limiter Controls
- Threshold - The point at which the limiter starts to work.
- Release - The speed at which the limiter disengages after a signal drops below the threshold.
- Attack - Some limiters will offer (attack) control over the speed the processor engages after a signal reaches the threshold. Usually set very fast or instant.
Why
use them?
Limiters
are used extensively in audio production, mixing and mastering. Here are a
couple of common applications:
- To
safeguard against clipping – Applying
a limiter to a track will ensure that no part of the signal will exceed a given
level (threshold) this means that you can be sure that the mix or recording
wont ‘clip’. This is known as ‘brick wall limiting’.
- As a heavy-duty
compressor – As previously
discussed, a limiter is essentially a compressor with the ratio turned up. This
means you can use them to really push perceived loudness
of your audio. See Death Magnetic by Metallica for an extreme example.
Gates/ Expanders
 |
| ProTools Expander/Gate |
What
are they?
I
always think of a gate as the entrance to a club with a bouncer who is prejudiced
against short people. If you are below a certain height (the threshold), you
are not allowed in….
Gates
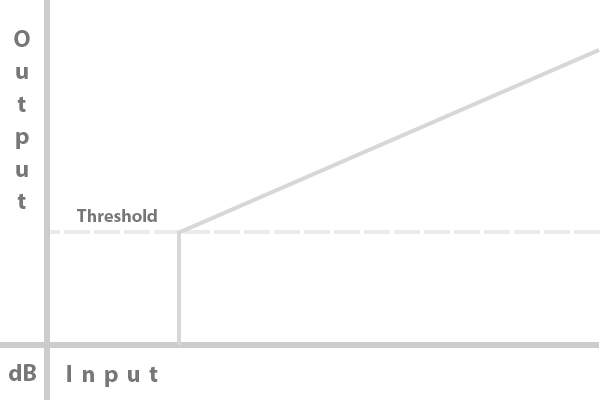
are like an upside-down limiter; they eliminate all signal below threshold
level, rather than above it, as a limiter would. They are called gates because
they ‘shut the gate’ on any signals not exceeding the threshold.
If a
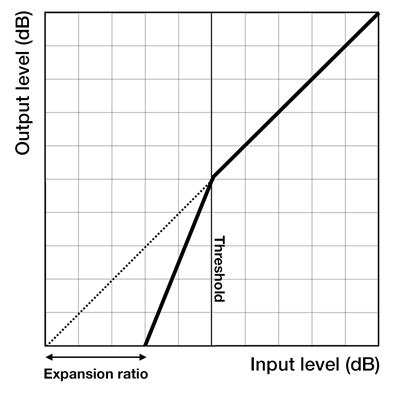
gate is an upside-down limiter, an Expander is basically an upside-down
compressor. It’s like a gate but you have the ability to adjust the amount
of attenuation taking place below the threshold point using a ratio control. The
reason they are called expanders is that by attenuating signals below the
threshold, they are expanding the dynamic range.
 |
Image 1 Noise Gate
|
 |
Image 2 Expander
|
Basic Gate/Expander Controls
- Threshold – Sets the level at which the gate starts to allow signals through
- Ratio – Basic gates don’t have these, expanders use the ratio control to allow variable adjustment to the amount of attenuation being applied to the signal below the threshold level.
- Range – Some limiters allow control over the amount of gain reduction once the gate is closed. This works similarly to the ratio control on the expander but the slope (ratio) remains constant. See picture below.
 |
| ProTools Expander/Gate showing gain reduction and constant slope angle |
- Attack, Hold and Release – The speed that the gate/expander opens, remains open and closes after a signal drops below the threshold level triggering its operation.
- Sidechain/ Key input - Similar to a compressor, some gates have a function whereby you can sidechain external signals to open the gate. See demo here.
- Gates can help eliminate leakage between instruments (or individual drums) in a multi-mic recording environment.
- To create sidechained gated effects. For example by using a rhythm track as a sidechain input on a gate inserted on a string instrument track, to create a choppy effect.
- Expanders are great tools for reducing background noise in a recording, such as the hum of an air conditioning unit.
- Vocal recordings, to get clean separation between the words and phrases.
- To eliminate amp noise etc. from overdriven guitars.
- To create Gated Reverb and other gated effects by adding a gate after the effect in the channel strip or signal path.
De-essers
 |
| Waves DeEsser |
What
are they?
De-essing
is the process of reducing sibilance or high frequency harshness from ‘Shh’, ‘S’,
‘X’, ‘F’ and ‘Ch’ sounds from a recording. This can be done in a number of ways
including the time-consuming method of clip processing, where you find each
problem sound and reduce its gain through editing. De-essers are a dynamic
process which aims to do this for you, by focussing in on a frequency and
compressing it, thereby attenuating the problem frequencies automatically during
playback.
Why
use them?
A
quick and easy way to reduce sibilance or high frequency harshness from
vocals (‘Shh’, ‘S’, ‘X’, ‘F’ and ‘Ch’ sounds).
Try
using them to reduce harshness on other instruments, not just vocals.
E.g. Guitars
Basic DeEsser Controls
- Frequency - The selected frequency range you would like the de-esser to compress.
- Threshold - The point at which the de-esser starts to compress the selected frequencies.
- Sidechain - The 'sidechain' filter which is used by the unit to detect energy in the selected frequency range rather than the whole signal. On the Waves DeEsser, this can be a bandpass filter or a shelf. The de-esser only kicks in when the selected frequencies hit the threshold. On the Waves DeEsser, you can monitor the sidechain. This means you can sweep through the frequency range of the signal (using the frequency control) to identify the problem frequencies (with your ears 👂🎧).
Multiband Compressors
 |
| Waves C6 Multiband Compressor |
What are they?
Multiband
compressors are just compressors which split the signal in to frequency bands (usually 3 or 4), allowing you to apply variable amounts and types of compression to each band individually.
Basic Multiband Compressor Controls
Each band will usually have:
- Threshold, attack and release , which serve the same purpose as on a conventional compressor, but only relate to the designated frequency band.
- Solo/Bypass for each band allowing you to listen to or bypass the processing on each band individually.
Some multiband compressors will have:
- Crossover controls - These allow you to set the start and end frequency of each band
- Q control to allow you to shape the slope of each band, as you would an EQ. See more here on Q.
- Sidechain input - as in a standard compressor but only relating to that band.
Why
use them?
- To achieve a consistent bottom end on a bass recording. Demo here.
- Live Sound engineers may use multiband compressors to quickly adjust frequency bands in on a live mix. For example there may be issues with proximity effect at around 250Hz, so if you set a band to around 250Hz you can quickly compress the signal if the signal is becoming problematic.
- Bass ducking trick. To achieve this, apply a multiband compressor to a bass guitar track, then set the band frequency at the kickdrum's fundamental. Next, create a sidechain input from the kick track on that band, so that the compressor band triggers on each beat. The result should be a duck of just the fundamental on the bass guitar allowing for a much clearer kick drum that 'cuts through'. The rest of the bass guitar track, that isn't competing with the kick, is left unaffected. Demo here
- To help fine tune your mix in the mastering stage. Demo here
Next...
In my next post, I'll be looking at some time-based effects. As always, feel free to comment, question and suggest using the comment section or via email.
Take care,
Ian


Comments
Post a Comment